
 Pet News


Summary
Trimming your dog’s nails is an important part of regular grooming that contributes to their overall health and well-being. Regular nail trimming prevents a number of problems, including overgrown nails, nail injuries, and damage to your home. This guide will walk you through the importance of nail trimming, the supplies you’ll need, preparation steps, a detailed step-by-step guide, and aftercare tips to help ensure a smooth and stress-free experience for both you and your dog.
Why It's Important to Trim Your Dog's Nails
- Prevent Overgrown Nails:
- Overgrown nails can curl and actually grow into the paw pads, causing severe pain.
- Pets with nails that are overgrown into the nail pads may require anesthesia for nail trims.
- Wounds caused by overgrown nails can become infected and need antibiotics.
- Reduce Injuries:
- Long nails can get caught in fabrics, carpets, and other surfaces, leading to broken or torn nails.
- Pets with torn nails may need sedation for veterinary treatment of the nail; usually cutting it back to the base to allow it to grow back without splitting.
- Long nails prevent full use of the foot pads, and increase the likelihood of slipping, which often leads to back or knee injuries in dogs.
- Long nails increase the risk of accidental scratches to you, your family, and other pets.
- Protect Your Home and Loved Ones:
- Dogs with long nails are more likely to damage furniture, floors, and other household items.
- Regular trimming helps maintain a quieter household, as dogs with properly trimmed nails tend to make less noise on non-carpeted flooring.
- Seniors, or those on blood-thinning medications, are prone to injury from dogs with long nails. In this situation, be especially careful to file or dremel the nails to be smooth.
- Promote Healthier Joints:
- Correct nail length helps keep proper alignment of the dog’s feet and legs, helping prevent joint strain.
- Short nails allow complete foot-pad contact with the ground, allowing the cushion of the pad to help protect the joints of the limbs, shoulders, and hips.
- Appropriate nail length allows full foot contact with flooring, helping the bones of the dog’s feet and legs work correctly anatomically.
Advertisement
Supplies You'll Need
Before you start trimming your dog’s nails, gather the following supplies:
- Dog Nail Clippers:
- Choose the best quality dog nail clippers for the size of your dog. These can be guillotine-style or plier-style, based on your preference and comfort. Choose Miller’s Forge or Resco brand (see our link and online store) for the best quality tool. You don’t want to be in position, with your dog trusting you, then have your clippers painfully twist the nail due to poor quality or dull blades.
- Styptic Powder:
- This is essential to have open and ready to use, in case you accidentally nick the quick with your clippers, which will cause bleeding. Styptic powder will stop mild bleeding quickly. (We all accidentally nick the quick eventually; sometimes we’re lucky and the dog doesn’t notice if it’s just nicked a tiny bit.)
- Kwik Stop Styptic Powder with benzocaine is most commonly used. A small container will last for years, since a small pinch will stop the bleeding.
- Towel, Blanket, or “Calm and Cozy Cat Wrap”
- Use a towel or blanket to wrap your dog securely if they tend to be fidgety or anxious in general.
- Consider a Calm and Cozy Cat Wrap for small dogs if you need extra wrapping help–this amazing US-made wrap can snuggle your dog to allow only one foot at a time to be exposed for nail trimming.
- High-Value Treats:
- High-value treats will help your dog learn to accept nail trimming as part of a regular grooming routine.
- Choose treats that are easy to give with one hand, that are appropriately-sized, and your dog really likes.
- Have plenty on hand, and choose a jar that you can shake as part of your routine for calling your dog for their nail trimming routine.
- Nail File and/or Dremel:
- A nail file can be used to smooth out any rough nail edges after trimming.
- For those who are good with training, have a compliant dog, and are good with tools, try a dremel. Dremels are good for shortening toenail length quickly, and for smoothing toenail edges. Be extremely careful though, especially with long-haired dogs, as the hair can instantly and dangerously wrap around the dremel mandrel.
Preparation
Choosing the Right Environment
- Find a Quiet Spot:
- Choose a small, quiet place where you won’t be interrupted, such as a bathroom, preferably where you can sit in a corner.
- A Well-Lit Area:
- Ensure that you have good lighting to see the nails clearly and avoid cutting the quick.
- You can bring in a lamp if necessary, or use a head-lamp to improve lighting.
- Comfortable Position:
- Position your dog on a comfortable surface where they can sit or lie down.
- You may want to place them on your lap or a table with a non-slip mat.
Getting Your Dog Comfortable
- Acclimatize Your Dog:
- Spend a few days getting your dog used to having their paws touched. Gently handle their paws and press lightly on their toes to extend the nails.
- If you are starting with a puppy, follow the guidance of a good puppy book, such as Puppy Start Right, by Kenneth and Debbie Martin.
- Positive Reinforcement:
- Use treats and praise to reward your dog for allowing you to handle their paws. This helps create a positive association with the process.
- If you are doing clicker training, have your dog touch the nail trimmers, then treat them. If you are not doing clicker training, simply show your dog the trimmers, then give a treat.
- The more positive associations you make with nail trimming, the better it will go. You can give a treat when:
- You prepare your supplies with your dog watching
- You carry your supplies to the trimming spot
- You call your dog to the trimming spot
- You sit down with your dog in the trimming spot
- You show your dog the trimmers
- You touch your dog’s foot with your hands
- You touch your dog’s foot with the trimmers
- You get up from the trimming spot
- You leave the trimming spot
- You put your trimming supplies away
- All this reinforcement and you haven’t even trimmed a single toenail yet! This is what we mean by helping make positive associations with the process of trimming.
- As you begin trimming, you will reinforce each toenail with a treat, until your dog becomes used to the process.
Step-by-Step Guide to Trimming Your Dog's Nails

- Prepare Your Supplies:
- Ensure you have everything within reach: nail clippers, styptic powder, towel, treats (in a container so your dog cannot help themself), and a nail file or dremel.
- Inspect the Nails:
- Gently hold your dog’s paw and press on the pad to extend the nails. Look for the quick, which is the pink area inside the nail containing blood vessels and nerves.
- You will not be able to visualize the quick through black toenails.
- If your dog has one or more white nails, use them as a guide for the black ones.
- If your dog’s feet are dirty or muddy, wash and dry them first.
- If your dog’s feet are very hairy, consider trimming the hair around the toenails for better visibility. If this is stressful for your dog, trim the hair with lots of treat rewards, then resume nail trimming another day. Or take your dog to a professional groomer for help with hair trimming (and nail trimming, if you’re already there. Fun fact: some groomers will help teach you how to trim your dog’s nails–it’s always worth asking!)
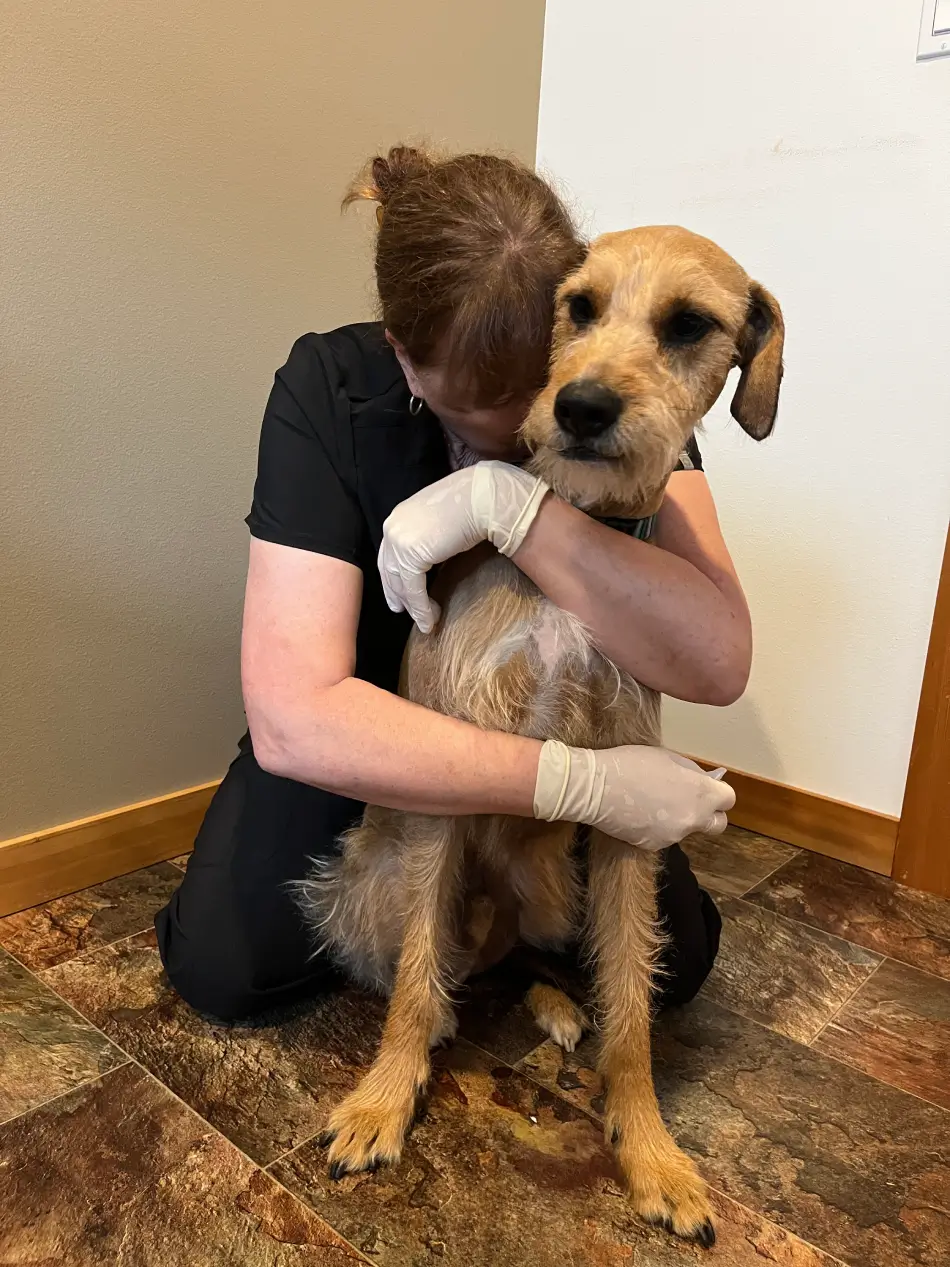
- Position Your Dog:
- Positioning your dog is key to success.
- Sitting in a corner with your small dog in your lap or tucked between your legs, prevents them from ducking away from you. (Note–this works well for giving oral medications and toothbrushing, too.)
- For large dogs, stand, bend, or kneel above or beside the dog, with your arms wrapped around them.
- For small or medium dogs, placing them on a table on a non-skid mat can work well, too. Wrap your arms around them from behind.
- If the table is in a corner, you can work in front of them, or someone can hold them so they can’t back away from you.


- Trim the Nails:
- Practice holding and squeezing the clippers so they are comfortable in your hand.
- Practice squeezing the clippers so they make the usual toenail clipper noise, then give your dog a treat. See if you can get your dog excited to hear the noise, so they learn to expect a treat.
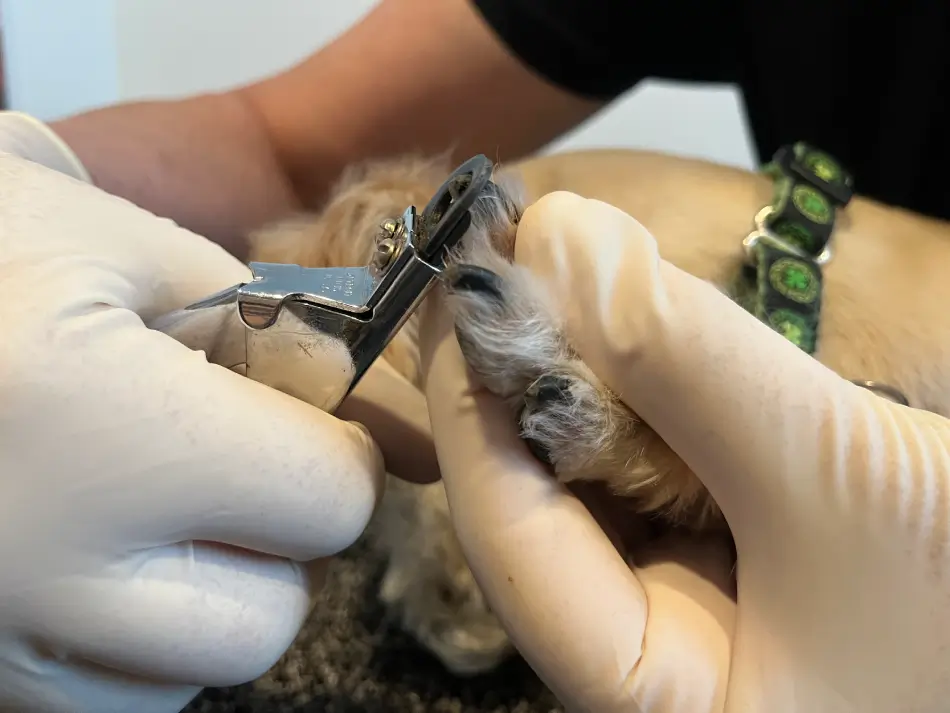
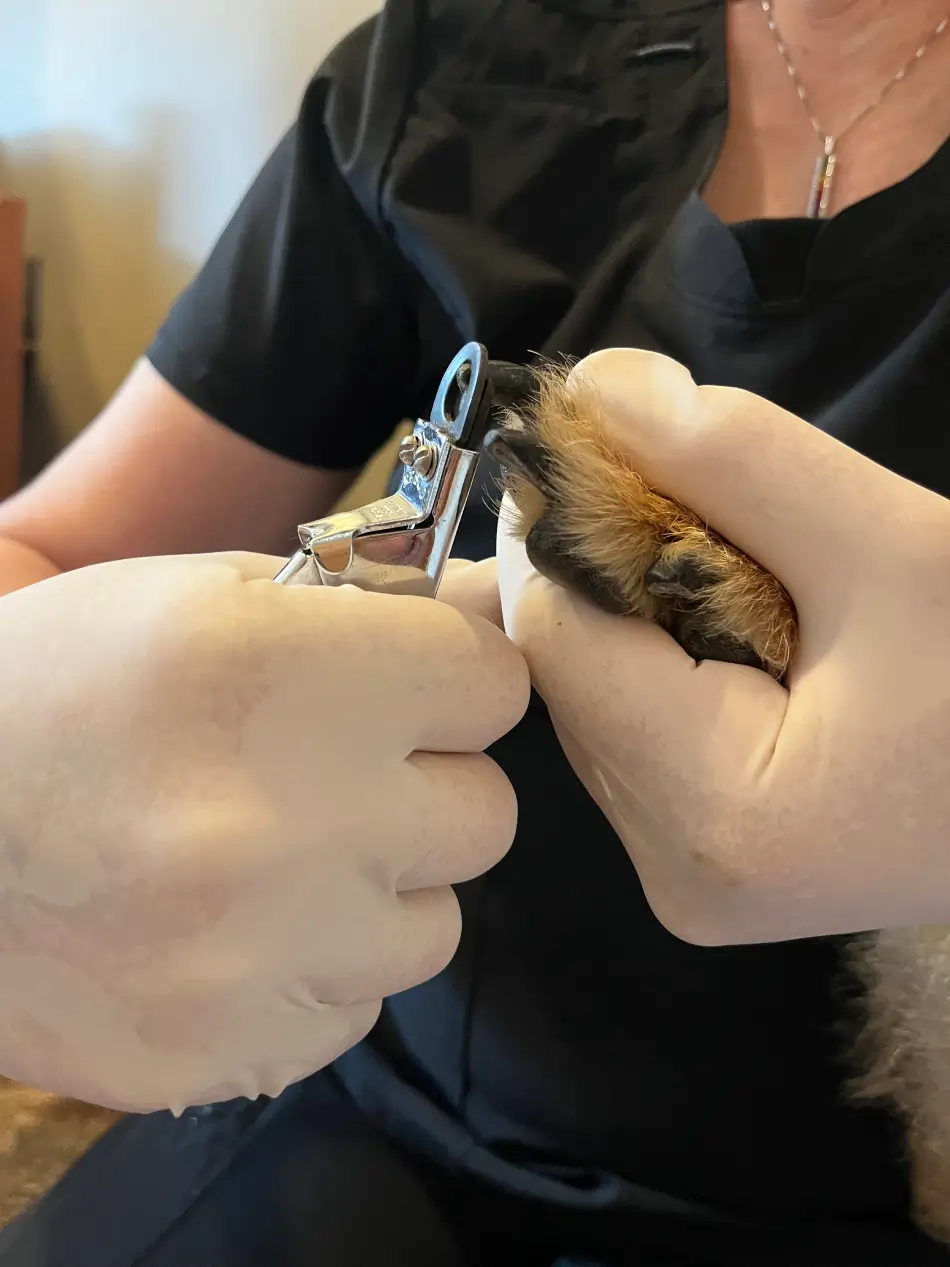
- When your dog is in a comfortable position, hold the clippers at a right angle to the nail and make a careful, clean cut of the very tip of the nail, according to the diagram on the trimmers packaging. Trim a small portion at a time, staying well clear of the quick. Give your dog a treat.
- Start with the front paws and trim the tips of the nails. Repeat the process for the back paws. Give your dog a treat.
- Toenails on the hind feet will almost always be significantly shorter than on the front paws. This is partly because the angle of the hind feet is slightly steeper than on the front feet. You must always be careful to trim less off from the hind feet as from the front feet.
- Be sure to check each paw for a dewclaw, and check that the dewclaw is not growing into the pad. Seek professional help if it is too difficult to trim curled dewclaws by yourself.
- Smooth the Edges:
- Use a nail file or dremel to smooth any rough edges and prevent snagging.

- Reward Your Dog:
- Immediately after trimming each nail, give your dog a treat and praise. This reinforces positive behavior and makes future nail trims easier.
- Give your dog a “party” when you’re all done. Jump around and clap, sing a song, throw their ball, do their favorite thing. Let them know how great they are that they did so wonderfully with their toenail trim!
- Take Breaks If Needed:
- If your dog becomes anxious or restless, take a break and try again later. It’s better to trim a few nails at a time than to stress your dog.
- Do short sessions with lots of treats and praise, especially at first.
Advertisement
Aftercare
- Monitor for Bleeding:
- If you accidentally cut into the quick, apply styptic powder to stop the bleeding. Keep an eye on the nail to ensure it heals properly.
- Nails that are accidentally quicked very rarely cause problems.
- Never trim nails to the point of bleeding on purpose.
- Check for Discomfort:
- Observe your dog for any signs of discomfort or limping after the trim. If they seem bothered, check the nails again to ensure they are not too short or uneven.
- Usually any soreness will resolve within a few days.
- See your veterinarian if soreness continues beyond a few days.
- Maintain a Routine:
- Establish a regular nail trimming schedule, ideally every 2-4 weeks, depending on how fast your dog’s nails grow.
- Consult Your Veterinarian or groomer:
- If you are unsure about trimming your dog’s nails or if your dog has particularly difficult nails, seek advice from your veterinarian or groomer. They can show you proper techniques and help with any concerns.
Troubleshooting Common Issues
- Dog Is Too Anxious:
- If your dog is too anxious, go back to the beginning. Make sure you are staying calm yourself. Take it slow and go one step at a time.
- Try trimming one nail per day and gradually increase the number as they become more comfortable. Use plenty of treats and positive reinforcement.
- Ask a friend or family member to help hold and comfort your dog.
- If you still can’t achieve success, ask a local groomer for help, or get help from your veterinarian or their staff.
- Difficulty Seeing the Quick:
- For dogs with dark nails where the quick is hard to see, try using a flashlight to help illuminate the nail. Trim small amounts to avoid cutting the quick.
- Try trimming a small sliver of nail at a slight angle from one edge of the nail, then a small sliver from the other edge of the nail. This allows incremental shortening of the nail without cutting into the quick.
- Consider using a dremel for shortening the nails instead of trimmers, to avoid quicking the dog. It may be worth the extra training time even if the dog is nervous at first, due to the sound or vibration of the dremel.
- Dog Is Aggressive:
- If your dog becomes aggressive, stop, and do not run the risk of getting bitten.
- Consult with your veterinarian for tips to help calm your dog during nail trims.
- They might suggest a mild sedative for home use such as gabapentin, and a pheromone such as Sentry Calming Ointment to put on their nose, and a pheromone diffuser such as Adaptil® for the room where you’ll trim the nails or where your dog spends much of their time. (Both are available in our online store.)
Maintaining Long-Term Success
- Consistency is Key:
- Make nail trimming a regular part of your dog’s grooming routine. The more consistent you are, the more your dog will get used to the process.
- Positive Reinforcement:
- Always reward your dog with treats and praise. This creates a positive association with nail trimming and makes future sessions easier.
- Keep Nails Healthy:
- In addition to regular trims, ensure your dog’s nails remain healthy by feeding high-quality food, and monitoring weekly for any signs of nail or paw issues.
- Check in between the nails and pads for foreign bodies and matts daily depending on your dog’s coat and their activities.
- Omega-3 supplements such as Welactin® can be helpful if nails are dry or brittle.
Conclusion
Trimming your dog’s nails is an important part of their overall care. While it may take time and patience to get your dog accustomed to the process, the benefits far outweigh the challenges. By following the steps outlined in this guide, you can help ensure your dog maintains healthy nails, preventing potential problems and promoting a happier, healthier life.
Remember to start slowly, use positive reinforcement, be consistent with your efforts, and don’t be afraid to ask for help when needed. Your dog’s nail health is worth the investment of time and care.

By Karen E. Mueller DVM, AVCA Certified
Dr. Mueller has over 30 years of experience in general small animal veterinary practice, feline medicine, and shelter medicine. Dedicated to preventing pain in pets and improving their quality of life, she currently has an animal chiropractic practice in Bellingham, WA. Dr. Mueller is also passionate about reducing pet overpopulation and works with high-volume, low-cost spay and neuter nonprofit programs throughout the Pacific Northwest.